
Here’s how you get your free water: install a rainwater harvesting system!
I know, you’re thinking it’s easy for me to say. Heck, where I’m from in Ohio, we get 42” of rain each year! Of course a rain barrel or rain tank makes sense. But you might live in the southwest US. There’s not enough rain to make it worth it.
Ha! Gotcha good! No matter where you live, especially in dry regions, rainwater harvesting systems are incredibly beneficial and useful. The less rain you get, the more helpful the free water becomes.
You know that roof on the top of your house, it not only keeps your house dry, but it can also keep your rain tank full. In a given year, the total square footage of your house is enough to capture thousands of gallons of water.
Jeepers, that’s a lot of water!
So here’s the only catch – the bigger the reservoir, the more water you can keep.
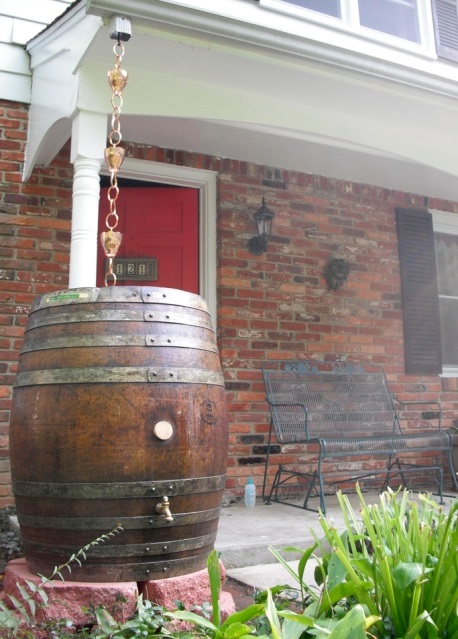
Who said rain barrels can’t be pretty?
Most people don’t want a giant water tower in their side yard. I get that. My wife definitely gets that. So what do you do? Well, I suggest you put in the biggest and prettiest rainwater harvesting system you’re comfortable having in your yard.
Yes, I said ‘prettiest.’
So let’s start with the how much water you can get, and then we’ll get into what these things look like and the basics of how they’re set up.
How much rain hits your roof?
Once you figure out how to calculate the amount of rain hitting your roof, you can better determine an appropriate size of your rain system.
If you don’t want to manually do this calculation, never fear! I have compiled a rainwater harvesting calculation worksheet at the bottom of the page that will do the work for you! This worksheet also contains a metric version.
But for those of you who want to know how to do this:
First, you need the total square footage of your roof footprint.
This is the horizontal space covered by your roof. You don’t need any fancy calculation to factor in slopes or angles here. All you do is take the width and length of your roof and multiply them to get your square footage. If you have a fancy house that isn’t a rectangle like ours, you can do this in multiple steps by calculating each rectangle, then adding them together.
Here’s an example. You measure the width of your roof, from end to end of your gutter and come up with 40’. Then you measure the depth of your roof from front to back and get 30’. You also have a garage that measures 20’ by 20’.
For a block footprint house, your square footage is:
Length x Depth = Square feet
For a house that is a fancy shape, you just do the same calculation for each section, and then add each answer up.
So our calculation is:
(40’ x 30’) + (20’ x 20’) = 1200sf + 400sf = 1600sf
Once you get the square footage, you then get your total rainfall in your area. There are many online resources for obtaining your annual precipitation. Here is one such resource I just found with a quick search: https://www.usclimatedata.com/
To get the total number of gallons that hit your roof, you need to do another calculation:
Square feet x Annual Rainfall ÷ 12 x 7.48 = Total gallons
(For you nerdy folks like me, the ‘÷ 12’ converts annual rainfall to feet. The ‘x 7.48’ converts cubic feet to gallons)
So for our pretend roof, let’s say we live in Tucson. We get only 11.3 inches of rain per year. Let’s see how it stacks up.
1600sf x 11.3” ÷ 12 x 7.48 = 11,269 gallons!
And that’s with only 11.3 inches of rain per year!
Now that we know our total rainfall catchment, how much do we get in a one-inch storm at our home? Well, all we do is substitute our 11.3” in the previous calculation with 1”.
1600sf x 1” ÷ 12 x 7.48 = 997 gallons
Even with one good thunderstorm, we get almost 1,000 gallons of water!
With these calculations, you can now make an informed decision on the type of rainwater harvesting system to install.
An attractive rain barrel in the landscape
Rainwater harvesting system options
There are a wide variety of rainwater harvesting systems available based on your interests and needs. Because this is a relatively new market that is just beginning to gain traction, a lot of solutions are DIY-style or repurposed. That being said, there are also some very effective and attractive options available as well.
Big Box Store Option
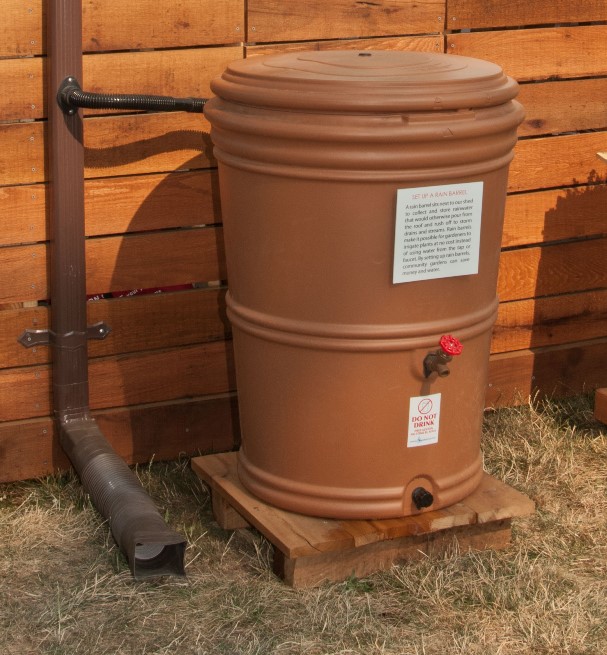
An example of a rain barrel purchased from the store
Let’s start with what you get at your big box store. At a place such as Home Depot or Lowes, you can find a basic setup to hook to one of your downspouts.
Your big box store option often consists of a 50-100 gallon barrel, a downspout diverter with debris filter, and an overflow reconnect to the downspout. This setup generally sets you back about $100.
The benefits: This is a great entry point if you just want to ‘test the water.’ (sorry, can’t help myself. But my dad would be proud of that one.) You get an effective storage container that often is very aesthetically pleasing. They often have a nice spigot or hose bib at the bottom for water dispensing. And the entry cost is relatively low for something that doesn’t scare the neighbors.
The drawback: The system is generally very limited, with only 50-100 gallon capacity. This is often not enough for more than watering a few container plants or individual plants throughout your landscape. Each barrel is connected to an individual downspout. So if you want one for each downspout, you’re talking about $100 per spout.
Landscape Contractor Option
There are many landscaping companies that provide rain harvesting systems and installation services. Obviously the expense of an installation from this route will be much greater and highly varies based upon the extent of the installation. But there are many more options of both size and aesthetics that may be well integrated into a design or placed in convenient areas.
DIY Option 1: Barrels
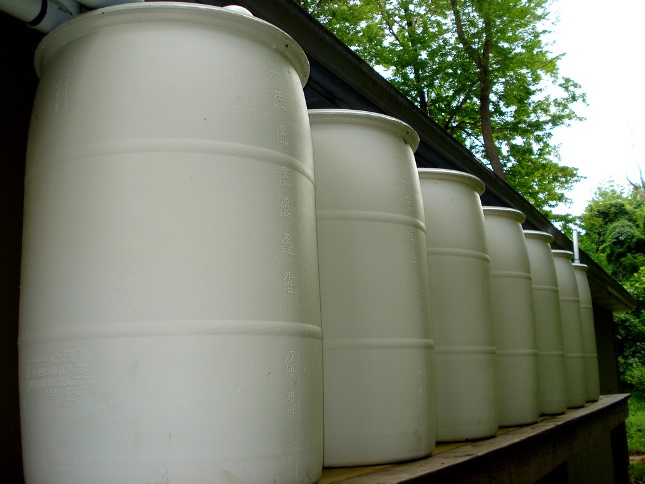
A large DIY barrel system, showing expansion beyond just one barrel
If your goal is an inexpensive option to just get started, this may be the right option for you. Most areas have fairly easy access to 55 gallon plastic barrels. These can be easily set up with downspout diverters and potentially connected in series with standard outdoor grade pipe from the local hardware store. You can find plastic barrels through local distribution centers and often on Craigslist. Make sure you get food grade barrels! These are used to store all sorts of industrial chemicals and foods. You do not want a barrel that has stored some sort of harmful chemical.
There are all sorts of guides and Youtube videos that explain different designs using commercial food grade drums. So for the sake of brevity here, I suggest going there if this is the route you want to take.
DIY Option 2: IBC Totes
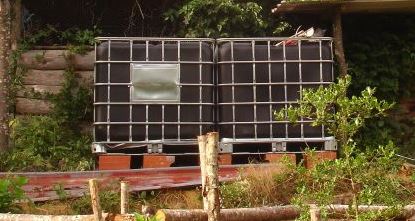
A simple DIY tote system
As a step up from using 55 gallon barrels, industries use these larger containers called intermediate bulk containers or IBC totes or tanks. These containers often hold 275 gallons each and can be interconnected to increase the size of your system. Most of these containers have a spout at the bottom that can be converted via PVC connections to standard hose thread.
When using a tank of this size, it is important to prepare a sound underlayment surface that will not move or fail, as a full 275 gallon tank holds nearly 2300 pounds of water.
IBC totes are often only semi-opaque and allow some light through the tank. It is very important to cover or paint the tanks to ensure no light enters, or else algae growth will become a problem.
While using both this option and the barrel option requires more work, they can often be done rather inexpensively, allow for customized design, and can accommodate expansion of the system in the future if desired. As with the barrels, there are all sorts of guides and Youtube videos that explain different designs using commercial food grade drums. So for the sake of brevity here, I suggest going there if this is the route you want to take.
DIY Option 3 and beyond: Get creative!
If you really want something unique, you can design your own reservoir from the ground up, literally. Many people have gone this route, designing a rain catchment tank that is as large and as attractive as desired. Such tanks can be made from culvert pipe sections, steel reinforced cement, or in-ground tanks. They can be given finishing touches such as a stone or brick exterior to match the structure. I have seen tanks with a beautiful wooden wrap to evoke a rustic feel.
Really, the opportunities are endless here. The only caution is to ensure that the tank construction is structurally sound enough to hold large quantities of water, to ensure the reservoir is not prone to rupture.
So it is time to determine your best option and run with it! Let’s start collecting our free water for our landscape to reduce cost and our environmental footprint at the same time!
“Water is the driving force of all nature” – Leonardo da Vinci
Get your free Rainwater Catchment Calculator!
Photo Credits: Michael Verhoef, Ken Mayer, Agrilife Today, US Department of Agriculture, Chiots Run, hardworkinghippy


Leave A Comment